I finished my model of Maya. In the end, I’m very dissatisfied. The character model itself isn’t terrible, but has a lot of flaws. I modeled the clothing the old way, thinking it would save some effort, but it ended up being more of a hassle. I think next time, I’ll sculpt and retopo it instead. I also noticed clipping on the skirt that shouldn’t be there; it’s rigged the same way as the body, so it should have moved as one.
The Freestyle lines behaved unexpectedly in a lot of places, too. The mouth and fingers, for example, are totally covered by the lines. It’s not a good look at all. I wanted to change it, but for some reason, the shader took a ridiculously long time to render; it was all I could do to get one image. Partly, it was because Freestyle, I think; the hair is dense and a bit complicated, so it probably made it choke. I added the hair to a collection that Freestyle should have ignored, but I must have made an error, because it rendered it anyway.
I did manage to work out rigging now, at least. I used a mesh deform for the body, and then armatures for the hands and face. It was really tricky setting up the vertex groups just right for that, and a hassle, but it can’t be helped.
I have that now, though, so I’m going to save it separately for easy reuse on other character meshes. That way I won’t have to re-rig entirely each time. In this instance, I made a larger duplicate of the main one to use on the clothes. Next time, I might just make only one cage for all of them and just make it bigger. I need to change the weights in some places, though. The arms didn’t deform quite right. It might be a corrective shapekey requiring issue.
I’ve also realised I should change tactics with some things. With this model, I used normal maps instead of a higher poly count, because I thought a lower-poly mesh would be easier to work with. It was, but it also limits it. I can’t modify the shading normals the way I could on a standard mesh, because the normal map would be applied after that. And it ended up being a pain trying to keep the details via the normal map; I think next time, I’ll just make a higher poly mesh from the sculpt and preserve the details as much as I can via raw polycount instead of tricks.
I also need to revise my watercolour shader; I need to find out why it was so slow to render, and fix it. It was too sluggish to modify the shading using my vertex colours method, so I had to render as was, which is not ideal.
I have a lot of things to do differently next time. I’ll do better. Next, I’m going to make models of Malik and Mariku using those techniques.
I’ve upgraded my watercolour shader again. I found it was performing badly, so I rewrote it entirely. It worked better, for a while, but seems to have become slow again. I’m starting to think it’s just a Blender issue. I have also noticed, it’s become so complex, even recompiling it just for the material preview is very slow. It’s quite terrible.
I modified it to work better with retaining the colour on dark colours. Basically, it does the standard interpolation, then uses that for a second interpolation with a set border, only falling off from the retention amount to white after that point.
I also added ambient occlusion. It wasn’t difficult, but it’s harder to get right than normal shading. I may just end up faking it instead.
Lastly, I changed my interpolation function. It used to just switch between them, but now I’ve given it the ability to interpolate between different types of blending, for more varied results and more control. It’s not performing well, though; I should interpolate between their respective factors rather than doing all of those interpolations and then blending the result.
Somehow, this shader is a lot slower than V6 and V7. It might be the AO, or something else; I need to get to the bottom of it, because I need it to be fast and responsive.
I’m also finding, I need to work on the transparency. Things like sleeves are still an issue. I can bypass it by masking out bits manually that would be covered by worn clothing, but it’s inconvenient. I’d prefer not to have to deal with such things. I need a way to determine which things are occluded from view by others and not render them, but that seems like it would require ray tracing, which Eevee is not capable of at the moment. The edge soak is also rather weak on the skin-coloured monkey head.
A way to determine if it’s being viewed in perspective or orthographic would also be nice. It doesn’t display right in ortho anymore, because I used my depth-detecting function to scale the edge soak and edge noise textures so that they’ll stay relatively consistent whether they’re up close or far away.
I still have a very long way to go before this is what I want it to be. Still, this is progress. I also finished a character model of Maya, from Persona 2. By doing that, I worked out things I need to change. Next, I’ll make a post about that, then next I want to make Mariku, Ryou and the others.
I’ve spent quite a bit of time recently trying to get used to ZBrushCore and adapt to the way it works. I’ve become quite annoyed at myself; there are several things I didn’t know about it that would have been very useful if I’d known about them sooner. Like Dynamesh being able to preserve edges, or not, according to a slider. 3DCoat could make even topology using voxels, but was limited to the voxel grid, so it couldn’t preserve them. Having that feature has made it easier in ZBrushCore to do that. So I’ve been spending more time recently working in it and trying to adapt. I should have used it sooner, sigh. Although, from what I remember it was more expensive before, and didn’t have Sculptris Pro, its dynamic topology sculpting, when I looked before, but still.
In any case, I’ve been using it a lot. I’ve become quite accustomed to the controls now…I’m starting to see what proficient ZBrush users mean when they claim that it’s actually fine once you get used to it. When I went back into 3DCoat for some retopology, I had difficult navigating because I’d got used to way to do it in ZBrushCore.
So far, as far as workable model parts go, I’ve made a male and female base mesh. I made the male one for starters, mainly for practice. I want to make lots of character models…I’d rather they be bespoke, but sadly that’s just not practical. So, the next best thing is to make a base mesh to save time, then add unique heads and modify them into distinct models. That saves time, making it more workable, and is efficient.
I made the male one first, then retooled it into a female mesh. I was planning to make the female base mesh from scratch, but I really wanted to just have something. Looking at them now, the abs have kind of melted on the male one. I haven’t got the hang of smoothing just yet, entirely; I end up being a bit too aggressive with it. I want to make some proper models from these….Malik, Mariku, Ryou, Bakura, and lots of others. I didn’t give breasts to the female mesh; since those vary from woman to woman, it didn’t make sense to add them there. I don’t want to be one of those artists that gives all their female character models the same chest, or the same body type in general, at that.
I made hands and feet beforehand to practice and attach to the models. I didn’t get them quite right, though; the palm of the hand is bad, and the toes aren’t quite right. I sculpted them a bit differently to the way I saw in tutorials I got; I wanted them to be separate pieces, just in case that was ever a focus. It’s unlikely, since I don’t do anything focusing on feet, but I want the option.
Unfortunately, having put the effort in one details like the fingernails and toenails, they were erased by having to dynamesh them together onto the model. It seems ZBrushCore doesn’t have proper booleans. I have to resculpt them after. I also didn’t get them quite right, the way the feet are on the models. Legs in general, I’m very weak at.
I started making a model of Maya from Persona 2, to see if I could get a decent character model. I found that even ZBrushCore was slow if I subdivided the whole model high enough to get high details on the face like sharp creases, but I could mask an area and subdivide that, and, unlike 3DCoat, it was still smoothable within that area because they were quads. Although, it meant any smoothing at the edge of the subdivided area was problematic. I could sort of correct it with the decimation smoothing of Sculptris Pro, but not so well. Next time, I’ll have to leave the sharp details for very last and not get ahead of myself.
I think I managed to make a decent face. I still haven’t worked out mouth interiors, though, and the ears were terrible so I drastically simplified them. Right now, I’m relatively happy with the overall state of it, at least. I think I’ve confirmed that sculpting that way can get reasonable results, as far as mesh quality is concerned.
I retopologised it in 3DCoat, but didn’t end up baking there; the 2048×2048 limit is too low, and upgrading to the pro version is too expensive. I baked the normals from the high poly in Blender at 4096*4096, with one UV map for the whole body, for the sake of speed. It seems to give decent results, though for long term stuff, I should make proper UVs; I went with a mangled automatic one for testing.
I also, while I was there, tried a Fake SSGI shader I came across, by 0451 on the Blender Artists forum. It’s clever; it gives more realistic looking results, and responds to lights better than a standard Principled Shader does. I’m planning to experiment on my pseudowatercolour shader and see if I can apply any of this into it. I’m not satisfied with how responsive it is, especially due to the use of colour ramps. I know of a way I might be able to make it respond to colour, too, which I need to experiment with.
Using a very simple version on the normal mapped, low poly model, it seems to soften the shadows a bit, when using a sun lamp and a point lamp, whereas the standard diffuse doesn’t really do anything. I’m sure someone more savvy regarding lighting setups could highlight it better, but what matters is, it’s useful. I’ll experiment with it.
It was inconvenient getting the model this far, though. I’d rather have baked it in 3DCoat, but other than the inconvenient texture size limit, and shoddy implementation of UDIMs I’d have to work around, it triangulated the model on import, which messed it up a bit, so I had to avoid it by baking in Blender, which is quite an inconvenient program to bake in. I need to find a more elegant solution.
Still, I feel I’ve made progress. There are anatomical errors with these models, no doubt, but I feel like I can fix it technically. That I’m not being held down by some stupid problem in the software. That’s refreshing.
As for personally, it’s been a mixed bag recently. I haven’t been feeling very good, and had a relapse of self-harm. I haven’t been sleeping well, either….I couldn’t sleep for most of the night the other day, feeling horrible, and when I have been sleeping, it’s mostly been nightmares. Perhaps it’s my brain’s way of telling me to wake up and make myself useful, haha. I get hunted a lot in my sleep. I often die. The other night, I dreamt me and some others were running away from a monster. We got to an arena, with a sign claiming the only way to stop the monster was for two people to fight in the arena and one to kill the other. I didn’t have the heart to kill my opponent, and woke up muttering a volunteer for death, not for the first time.
My sister has been more aggressive recently, too. We’ve been arguing more. The other night I got told to drink bleach because I yelled at her for yelling about some stupid crap in a video game she was playing. I was quite tempted to swallow some just to spite her.
Things will probably get better. I’m making progress, I think. I need to make more.
On this blog, I’ve mostly written about my NPR work so far. But the other reason I started it was to write about how things are going for me in general, too. It’s good to vent about things, or just process, so that’s what this post is for.
I’ve been quite annoyed at work recently. I work in a shop. Obviously, with the coronavirus pandemic, that’s made it more stressful than usual. During March and April, we probably had double or more our usual amount of customers coming in. That wouldn’t be so bad by itself, but since this lockdown, I’ve noticed more….Inconsiderate people. People who think the rules don’t apply to them, like signs saying not to enter and aisle because we’re working it – especially the bloody alcohol section – quite a few customers have blatantly ignored.
I get very frustrated with people like that; it’s like they think they and their…Petty wants are the only things that matter. They aren’t even buying anything important. I could understand at least, if they were bypassing the no entry barrier to get some toilet roll or basic food, but it’s not. It’s always the ones after their alcohol that think they’re more important. It’s making me quite cynical, unfortunately, as if I wasn’t enough already; I’ve really come to think that most people who live near the shop I work in are just alcoholics, and/or gambling addicts. Hell, according to the rumour mill, even one of the supervisors is an alcoholic.
Despite the pandemic, the lockdown, people have continued to come in several times a day to get their fix, buying multiple bottles of booze, or cans, or sets of scratchcards, cigarettes….Those people really make me dislike my job. I don’t want to help people continue their addictions. And I just really dislike having to serve people that think they’re more important than everyone else. Because of that, I’ve been developing more of an attitude recently; when a customer got angry at me for telling him to stand behind the line that marks a 2 metre distance, I just said “Whatever”. Not exactly great customer service, but I’ve really exhausted my patience for that kind of person.
We’ve also had a significant increase in threats towards staff members, and general shitty attitudes. I haven’t experienced much of that, though, at least directly to my face. I think it’s because they don’t see as a woman though, sigh; it’s the female members of staff who’ve been getting the most of it. Probably because they’re most likely cowardly men who feel more confident picking on them.
So work has been quite tiring recently because of all that. I have some time off soon, which I’m looking forward to. I hope I can use it well, as well as relax a bit. My colleagues are mostly good, at least; recently, I’ve been getting on well with one who I talk to about films and other media when we’re on shift together. He writes films and wants to work in that industry, so I can relate a lot with discussions about different things we look for in media, thoughts about generically popular stuff, etc.
On another note, I’ve recently been trying ZBrushCore. I got very frustrated with 3DCoat. I’ve been trying really hard, but no matter what I did, I couldn’t get a good enough surface quality. I upgraded my RAM, which helped get better performance, but it couldn’t let me get high enough to use voxel meshes at a high enough resolution to hide the jaggedness, so they’d never stand up to a close up. I realised, when it came down to it, the problem was the mesh type. It uses triangles, which are very hard to get a smooth surface with, and don’t crease well. So I thought I’d try Core; last time I checked it, it didn’t have Sculptris Pro, its version of dynamic topology, so I didn’t get it. I find ZBrush’s dynamesh-focused way of making a mesh very awkward…It feels unnatural to me to have to do the whole model at one fixed resolution, limiting how much you can detail it, having to do it all at once. I find it much more natural and convenient to just do what I want to whatever detail, without having to worry about resolution while I’m sculpting. Obviously, the final mesh needs to be even, but it’s so awkward having to think about topology while sculpting. It’s said to be easier because it forces you to focus on forms, primary, secondary, tertiary details in order, but I just can’t seem to get the hang of it.
Core is a lot cheaper than full ZBrush, which is sitting at like £900, basically. I’m quite enjoying it so far; it’s a lot easier to get a good, smooth mesh, though I’m having difficulty adapting my sculpting style. I’m used to using a flatten tool that levels area to block out a lot of shape, like slapping on a bit of clay and scraping off the excess to make a plane. Core doesn’t have that kind of brush, though it does have a somewhat similar brush, except it doesn’t level it.
I’ve been doing some sketching. Recently, I’ve been trying a more traditional style of sketching; just sculpting everything without thinking of it as something that needs to be ready to use on a retopologised model, like sculpting the eyes onto the mesh rather than giving it hollow eye sockets with separate eye objects.
They’re very bad, but to be fair, they’re sketches and I’ve been trying to get used to a new program. I found the navigation very difficult at first; I wasn’t used to the way ZBrush does it at all. Looking at them all now, though, I really need to vary my faces up. They all have the same cheekbone shape, and the way it makes that sort of 7 shape from the corner of the eye to the chin. And reference more, of course. The ears are only good on these because they’re a ZBrush asset, haha.
I’ve still got to totally get to grips with it, but I am finding it a bit easier now. When I have the money, I think I’ll buy it. I feel like I can make the mesh quality I need with this, since it generates quad meshes instead of forcing triangles on me. Although, I’ll still use 3DCoat for retopology, UVs, texture painting and normal mapping, since it’s good at those and Core has no such functionality.
Anyway, I’m trying to improve and get back on track with my sculpting. I want to get better and make more, and my watercolour shader is just waiting to be used.
I think I should make more posts like this, though. It’s good to just ramble about things sometimes, and talk about WIPs without feeling like I have to talk about some milestone.
Today, I’m making a post that’s a bit more general. I don’t really have readers, but maybe someone will stumble across it and find it useful. Or if I forget how I did it.
I’ve been struggling with a character model’s hair for a few days, because it’s curly. They seem to be quite complicated to make seem right, and also be controllable. I was looking at this video for a method of making hair.
I like this method. It’s not as realistic as other methods – not as easily, at least – but it is very controllable. I don’t like particle hair much. It’s a pain, and it leaves too much out of my hands. I’m not interested in simulations, either. I need more room for style and departure from what’s strictly realistic.
Anyway, at the end of the video, it referenced and showed a model with curly hair, but didn’t say how to do it, so I’ve been experimenting trying to work out how to do it.
I came up with this.
With a version of my Psuedowatercolour V6 shader applied.
I’m quite satisfied with how these look, actually, at least as far as testing purposes go. I tried a few different strands with differently curlyness, though I didn’t reference as much as I should. Mainly this has just been to experiment. I made a similar hair shader to the one presented in that video, and adapted it to my shader by using it to make the hair alpha. I could also use the bump, but I didn’t feel like it at the time. I didn’t get it quite right, though, since I was modifying it to test other things, so only the very ends appear uneven, which I need to fix.
Here’s how this method works.
First, you need to to make a curve. In this case, I made one curve object with multiple pieces. They have to be offset from the centre something like this. That’s very important. The distance allows control over how wide the curls in the hair will be, so I didn’t want to go too overboard. I used multiple pieces for a bit more volume, though it does give less control overall.
Next, make a new curve, and use the original one as a Bevel Shape for it. That’ll extrude the original curve along this one. Then, for each point along the curve, use Ctrl_T to twist it. This is where the offset in the original curve comes in. Because it’s offset, it’s twisting it around the second curve. By setting the twist amount on each, or most, of the vertices to something high like 360 or more degrees, it creates a lot of curls.
Then lastly, I use a subdivision surface to smooth it out. This can make the polycount high, so I make sure to reduce the resolution of the original curve and hair curve so they’re not too dense in the first place. Another modifier like the Smooth modifier might do decently as well, but this can make it very smooth since it adds geometry. Plus, you can increase or decrease it easily according to how smooth you need it to look on-screen at any given time from just one menu, whereas curves would need you to alter the resolution on the original curve as well as the second one.
I’m fairly satisfied with the results I’m getting so far, so I think I’m going to try applying it to Nagi’s character model and see how it goes.
It’s been a while since my last post. I mean to update more often, but I don’t end up doing it enough.
Since my last one, I revised my shader a few times. I’ve finally got one that I’m finding to be a decent mix of stability and functionality. I haven’t changed too much from before; I’ve swapped out the procedurals for baked textures from them, though it doesn’t seem to make much difference. I also was annoyed with the way I was applying texture in the previous version all as one at the end. It makes more sense to texture the main and shadow colours before they’re ever seen. Other than that, it’s mostly the same.
I recently worked on a model of the Kaibacorp building for Millie. I decided I’d practice with it.
I applied the shader to it, and I’m quite satisfied with the results. It’s…..Not perfect, but better. It seems to work better on static objects than organic things like character models. It’s less tricky….Characters have a lot more than can trip you up, I find.
I rendered two versions. One in standard perspective. The second is using a fake perspective on top of the usual one, made with the Lattice modifier. Faking perspective is very important to give it a 2d touch, so I wanted to experiment with it a bit. I should use a Mesh Deform in future, I think, for greater control, but the Lattice is quite useful. It’s quick and easy, whereas a Mesh Deform takes time to calculate. For this kind of perspective, I think it’s quite helpful. I could probably have exaggerated it more.
I also tried applying it for an experiment to a character mesh I’ve been sculpting. I’m still struggling, unfortunately, with getting satisfactory, crisp character models. It’s the same problems….The eyes, the mouths, nails….Those small details. I could model them onto the retopo mesh and just not use a normal map, but it seems…..Reductive. I want to be able to capture those details, without having to have a huge polycount. There are some times when I might want to throw out the normal mapped detail, but I’d rather have it conveniently saved to a texture map the rest of the time. Lower poly meshes are easier to work with and perform better.
In this case, that’s a work in progress mesh of one of my D&D characters, Nagi, a half-orc wizard. I’ve had difficulty with the paper texture on grey colours; with my current settings, I found it was too dark, so I’ve recalibrated it. The way my shader applies paper texture and edge soak according to what colour is used couldn’t be called physically correct, I think. It’s certainly no simulation of real watercolour. I’m just going by what appears right, what looks and feels right based on what I’ve seen. I think that’s probably a better way to go about it, as far as art goes.
I want to work on the edge soak, though. It’s not very prominent there, and I’ve found at greater sizes it seems to just….Dissolve.
At any rate, I feel like I’m making progress. I want to be able to update more soon.
I always mean to post here more. I don’t really get round to it enough, though. I’ve currently got it named Riya’s NPR Log, but I do mean for this blog to be more than just about that. It’s good to talk about how things are going, thoughts on things, etc. Nobody is listening, but it is good to write it out.
I’ve been very frustrated recently. With my sculpting, and art capability in general. I actually started getting back into 3D several years ago, after I met Millie. Her art is very cute. It inspired me to want to make some myself, but I can’t draw. 3D is all I’m good for, and even that is marginal. I hate myself. After all that time, what I can show for myself is…Very little. I always felt inferior. Looking around at what everyone else was making, they were…Vastly superior to me. My best was utterly insufficient next to their “sketches”. It still is. I’ve been working hard all this time to improve, and I have made progress…But I want to be better than this. I always feel “It’s not good enough yet“. It’s such a frustrating feeling….That, always, always, if I could get that one more thing, I would be satisfied. That the flood gates would open and I’d be able to do so much. But it never comes. The goalposts are always moving. Shaders/art style, mesh quality, anatomical accuracy, efficiency…I wonder why I hold them over my head so much. But somehow, I got into the habit, and it’s difficult to stop.
Everything I make, I feel crippled on. All I can seem to see is what’s wrong with it. I want to finish more things, but I can’t stop thinking about the myriad ways in which they’re lacking. That they don’t do justice to what I was trying to depict, or aren’t good enough to be seen. I really wonder how to fix this. I’ve been trying hard to improve my skills, but every time I improve, I end up feeling like what I did before wasn’t good enough, and thinking of a higher bar for what’s “acceptable”. There’s no such thing as “good enough”, or “good”; just things I can stand, for a little while, to call done. And then never want to see again because I’ll see all the errors and inadequacies.
I really don’t know how to fix myself. I wonder when I became such a perfectionist. I feel like a letdown. But I’m tired. I’m sick of being that one thing away from being good enough.
I really like to sculpt. I enjoy it. Anatomy is interesting. There’s a lot of diversity in people’s appearances. I like to learn about different NPR techniques and try applying them to the styles I want to create and replicate. There are lots of things I want to sculpt and render. But I really wish I could feel like anything I made was right, good enough or decent.
I wanted to make my Mariku model, but I decided to do a test model of another character first for practice and to see how my workflow would go. I decided to make one of Effie from Descender, before she was Queen Between.
I did two different lighting angles to test it. I’m fairly satisfied with my shader at this point….But not how I’m using it. I need to get more used to it, and adjustments I need to make to account for it. For example, the legs show through on the two images in several places where I forgot to turn on the clipping mask. I’d like a way to render them all as if 2d, if possible, all on one alpha layer, but I don’t know how I’d go about that with them as separate objects.
I also see I should change my linework. I was quite happy with the sketchy effect I was getting, but in practice, I don’t have the control I want; the nostrils, for example, get lines when I wouldn’t want them to, and it’s just…Inconvenient having to wait to see how it’ll look. I want as close to real time feedback as I can get.
I also need to work out the rigging. I used a proper armature this time, and then used the Data Transfer modifier to transfer the weights onto the clothes. She lacks her jacket in the render because I couldn’t get it to copy them and didn’t want to have to stop and rig that manually. I wanted to use the Mesh Deform modifier, but it was finicky and unreliable on this model, and having to unbind and rebind everything every time I changed the cage would be a pain. I also haven’t found a solution for unexpected behaviour triggered by having mesh deform and armatures at the same time.
I also just need to get better. The mesh quality is just not good enough. It doesn’t hold up to close ups and the anatomy isn’t good enough. Especially the legs. I’m not good at them.
Plus, I need to work out a better way to do the colours. I mixed them individually where needed, but because each colour has a set of values to go with it, it’s inconvenient. It’s just awkward. I could use two masks, one for total main colour and one for total shadow, but I worry it would damage the watercolour effect I’m going for, being too perfect and clean, whereas with multiple colours, the masks can be modified, such as adding edge soak at the borders, etc.
Lastly, I need to change how I’ll alter shading. The shader just won’t perform well enough to modify it in realtime with vertex paint as I’d wanted to. My experience of Blender’s texture painting makes me think it probably won’t handle using the texture-based method in a real scene, either. Normal editing is a nuisance, though. I’m uncertain what to do about it.
Still, I want to work something out. I’m making progress. I just wish I didn’t feel like I was constantly at the “If it was just a bit better…” Stage.
I’ve been working hard recently. Real life has been a bit tricky recently with the corona virus making people panic. I’ve had more overtime recently because work has been more hectic because of that, so I’ve been trying to make the most of my free time. With that, I’ve made a fair few changes to my psuedowatercolour shader, and I’m liking the results.
A problem I had before was that it didn’t work well for dark colours. I tried applying it to my Mariku model, but it looked so wrong. The problem was that it was also blending to the background colour, white. But in real paint, it probably wouldn’t do that; darker pigments seem to stain more, so a dark brown would probably just fade at the edges to a less dark brown. So, I added a new input for it, Maximum Blend, that defines how much the colour can blend with the canvas colour at most. This doesn’t affect the transparency, allowing me to keep my uneven transparent outer edge, while avoiding it looking too unnatural. I tried some more tests on my test models, including multiple colours this time.
I think it’s more effective than before, and I’m quite satisfied, mostly, with how the dark colours look here. The lighter ones look better, though.
In any case, there still problems. Main being the performance. Frankly, it’s insufficient. I might be using a laptop, but even so, it’s far too slow for my liking when I alter values or use multiple colours. In this instance, I used two copies of the shader mixed with a texture. So it’s running the entire thing twice, and I found it slow.
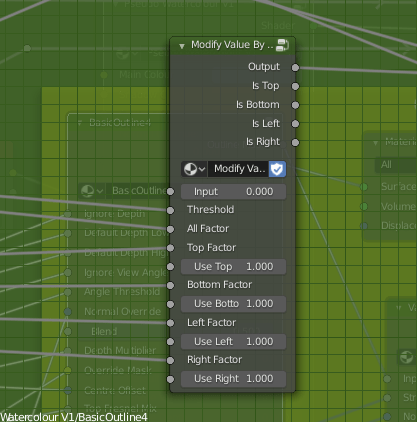
A more efficient way to do it would be to mix the values the shader uses beforehand, like the colour ramp inputs, mix the colours, etc. I tried making a node group for it.
Unfortunately, as you can see, it’s obscenely long. It’s ridiculous. Technically, it works, but it’s just not sufficient. It’s clunky and hard to use, and takes a long time to plug in. So, my next move with be to make it more efficient. I’m going to pack as many of those values into single inputs and outputs as possible. For example, I could combine the values for Silhouette Ramp Low, Silhouette Ramp High, and Maximum Blend into a colour. Colours limit it to 0, though, so I think I’ll use vectors. I’ll need to make one function to convert the full value set into the packed version, then another to unpack them, and a version of this function to mix the two, using the packed versions as inputs. Then I should have less to plug in to each thing.
I’m also going to add in again some features I took out. I thought that modifying things by viewing angle was making the node too large, but after thinking about it and testing it, it would be useful, I just need to use it more carefully. I’m also not currently seeing as much use for the depth as I’d thought before; I’ll probably remove it. By getting the depth from the node group I made, I could stick it in as an input anyway by using it as the override mask, rather than it definitely needing to be internal.
I have more to write soon, but this is it for now. I finally, mostly, solved my sculpting problem with smoothing, so I’ll have proper models to show soon. I’m currently working on one of Effie from Descender, for fun and practice. If I can make this work, I can definitely make Mariku work.
Since my previous post, I’ve been working more on my pseudowatercolour shader.
For starters, in the end, I abandoned the screen door transparency. I still have the nodes I made for it, and might use them again in the future, but I couldn’t get them to look close enough for my satisfaction right now. I think mainly the problem is with the patterns I used in each section. They were made mathematically, to avoid having to waste texture slots, but because of that, they’re not easy to work with. I need to set aside some time sometime to make better patterns, and probably modify the node groups. It currently has six steps, but I’d like to bump that up to eight smoother ones for a better transition. I found that the Alpha Blend option gave sufficient results, with less of a performance hit than I’d had previously.
I also started applying it to a person-shaped mesh, rather than the Suzanne heads I’ve been using up till now. I found that what looks good on that doesn’t necessarily apply to an overall model. A big problem I had, for example, was how the depth shading I was using changing dramatically from a front to top angle. On a tall, but narrow character like a human, what gave a smooth gradient at the front gave a bad, very harsh result from the top.
To fix that, I made a function that outputs a value from black to white according to the view the model is being used from. It uses the Object coordinate and Camera coordinate to tell where it’s being viewed from relative to the object’s direction. Currently, I just have it check the top, bottom, let and right, but I could easily add options for the front and back, too, though I’ve not really needed to since they’re fairly easy generally. Using that, I can modify the use of the depth based on the view. Initially, I wanted to use it to modify how much depth is used, but I decided instead to use it to modify how much the depth is blended with the fresnel, since from some views the depth isn’t needed to smooth it and just gets in the way. I also remade the function that adds noise to edges, such as the outline or shading.
I also modified the fake paper texture, and generally tidied the shader up, putting it into a node group. The main reason I had it outside of one before was to use colour ramps. Linear interpolation lets you control it from outside a node group using numbers, and can drive them by other things, but it isn’t organic looking because it’s linear, rather than smooth. To solve that, I read up on different types of interpolation and implemented them. Using those, I found I got smoother and adequate results.
I also modified the edge soak to be driven by maths, rather than a colour ramp, so the strength and size are determined that way, too. The end result is a very long nodegroup, but I think it has a good amount of control.
The last thing I did was revise my linework. I hadn’t given it much time until now, but it really can be a big help to make something look more 2d and natural. I used two layers, basing it on Dustin Nguyen’s linework in Ascender.
I noticed that quite often, lighter sketch lines can be seen in his art, with stronger, more final overs over the top. It adds texture to them, and I thought applying a similar effect could help make my work look more 2d and created by hand. I used varying amounts of Sinus Displacement in freestyle on them, to make sure the lines don’t perfectly match the shapes. On the test background piece, though, I used one with very little; I think it looks okay on characters for it to be uneven, but environmental pieces would need straighter lines.
With Lines/Without Lines
I think the linework really helps it look more natural. Considering it without them, it’s dissatisfactory. It looks too 3d. I think it’s the white edges. I used transparency with a threshold and noise so they don’t perfectly match the 3d shape, but I don’t think it’s enough. I’ll have to work on that; if just taking the lineart away makes it look 3d, it isn’t good enough.
Still, it is progress, and for once I’m feeling relatively satisfied with the results.
Next, I need to improve the outline of the models themselves, and start to add more options. As it stands, it’s only diffuse shading; I want to be able to account for things like reflections and subsurface scattering. Not all of the options PBR shaders have will work in Eevee, since I’m using the shader to RGB node, but it should be possible to fake some of them. I also want the shader to account for the colour of lights, and multiple lights. Blender NPR recently did a video showcasing a method that allows up to three lights, but I think I know a different way to get the results from different lights and their colours.
I’ll be adding that in later, and saving my progress on the shader as I go. But for now, I want to focus on sculpting and applying the shader I do have to them. I can learn and implement more as I go. I want more to show for myself than test files. I’m going to apply it to my Mariku model, and the others, too.