Changing is Hard…

This year, I’ve really been wanting to improve. Not just technically, as always, but mostly in terms of my output. Finishing models and not being so perfectionist about them and scrapping them like I have done in the past. I’ve been working hard on that, but it’s very difficult. I realised, at some point my goal just slipped. I started just wanting to make art of the characters I liked, and then it became “Make good(TM) art”. I got into the habit, and lost so much time just studying and redoing.

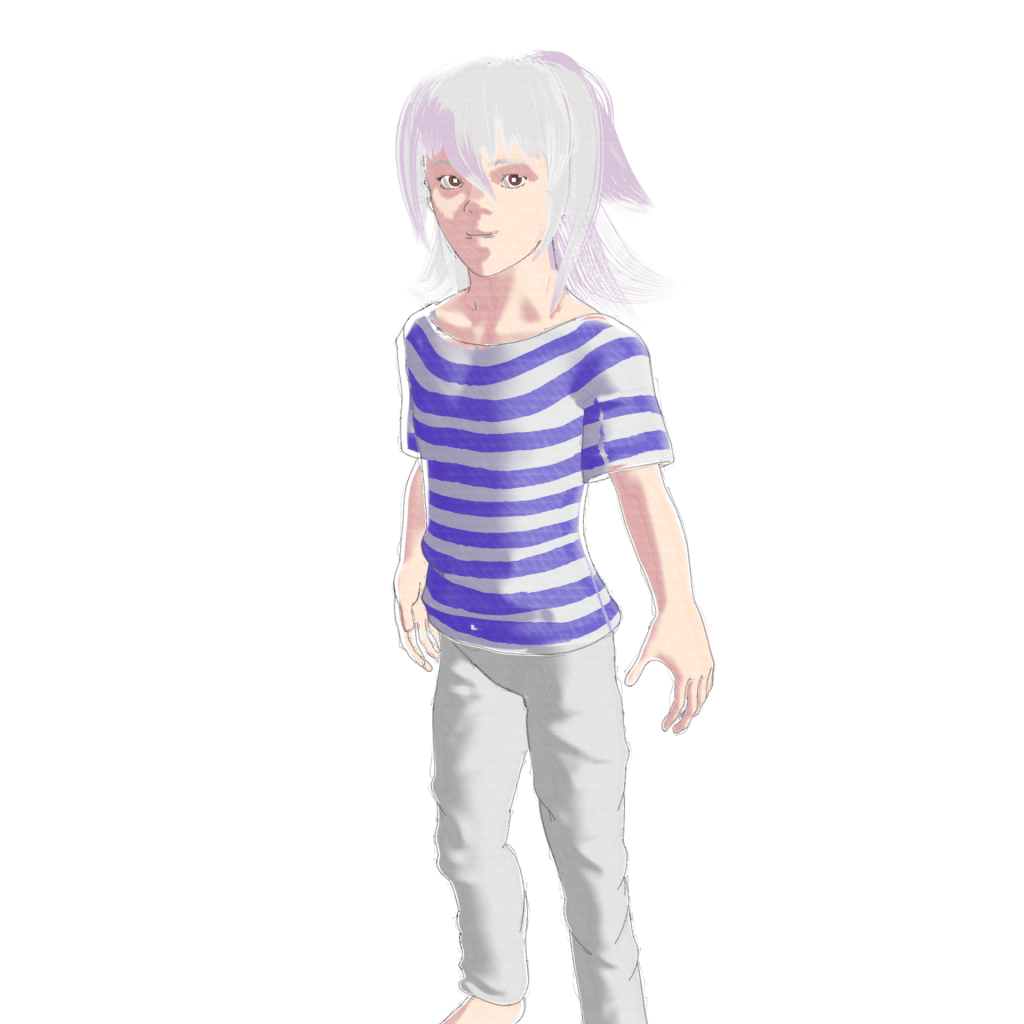
I’ve been trying to change that this year, but, to my horror, it’s already March. Almost the end of March. I’m honestly not sure where the time went; it seemed like it was just January. I’ve been bogged down with bad mental health and work, and somehow the time slipped right past me. Seeing that, I wanted to push myself. So I decided to make another model. This time, I wanted to try two things. One, making a slimmer base mesh that’s easy to transform into what I need, and two, making a model of Heat.

I’d been struggling a lot in technical ways. Things like, the massive difference between the density requirements for a head and the body. Keeping important details without having to dynamesh the whole thing to a heavy and hard to smooth polycount. How best to make a reusable basemesh without leaving it too rough and undefined; having solid anatomy but also making it soft enough to be versatile. These kinds of things cause me a lot of frustration. I often wish that it was more like real clay might be. Reality doesn’t have a polycount; if you want to smooth something, you can just smooth it. Or tricky angles; you can just rotate your model with one hand, and your tool with the other. The angle you’re using isn’t view-dependent. I found, surprisingly, that it felt like it would be a lot easier if only it was a bit of clay in my hands.

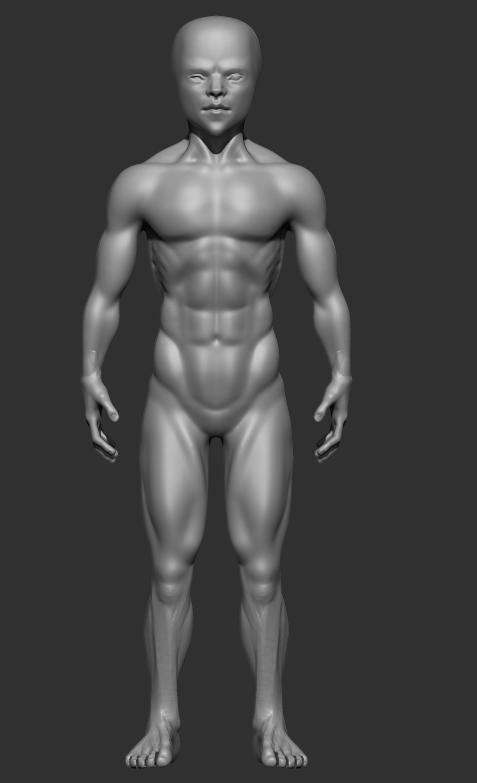
Still, I did try. I made a relatively basic mesh. Just defining the anatomy a bit, but not going overboard.

I’m still crap at legs, and struggle to soften forms in a way consistent with skin. Just using the smooth tool is insufficient; the effect of skin isn’t just smoothing it. It also fills in the gaps, and, with some things like back muscles, for example, can make them seem to take on a different shape, or connect into other muscles that they’re not attached to. It’s very difficult.

But from there, I was able to build it up into a more muscular body. It’s a bit more muscle than the character I was aiming for actually has, but I’ll call it artistic licence.

I’m actually fairly happy with the torso. It has problems, but it’s not terrible, exactly. The legs aren’t good, though.

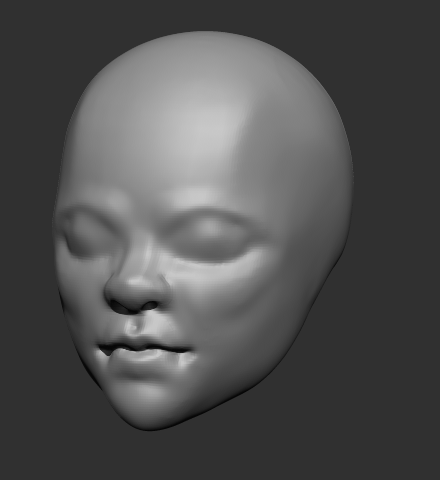
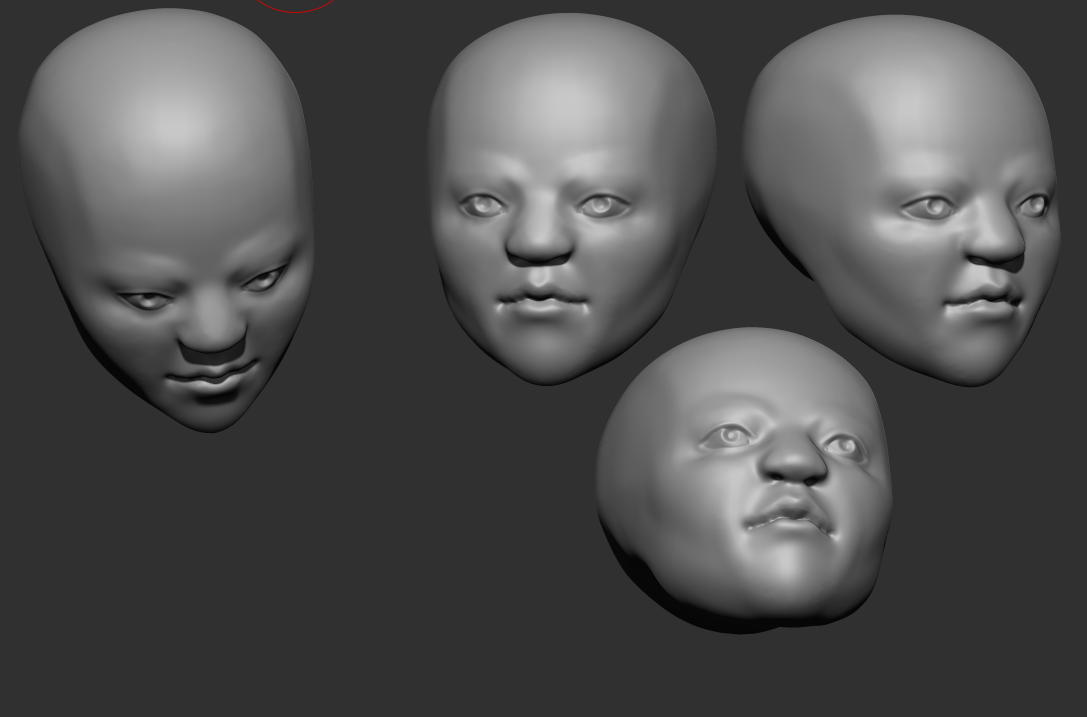
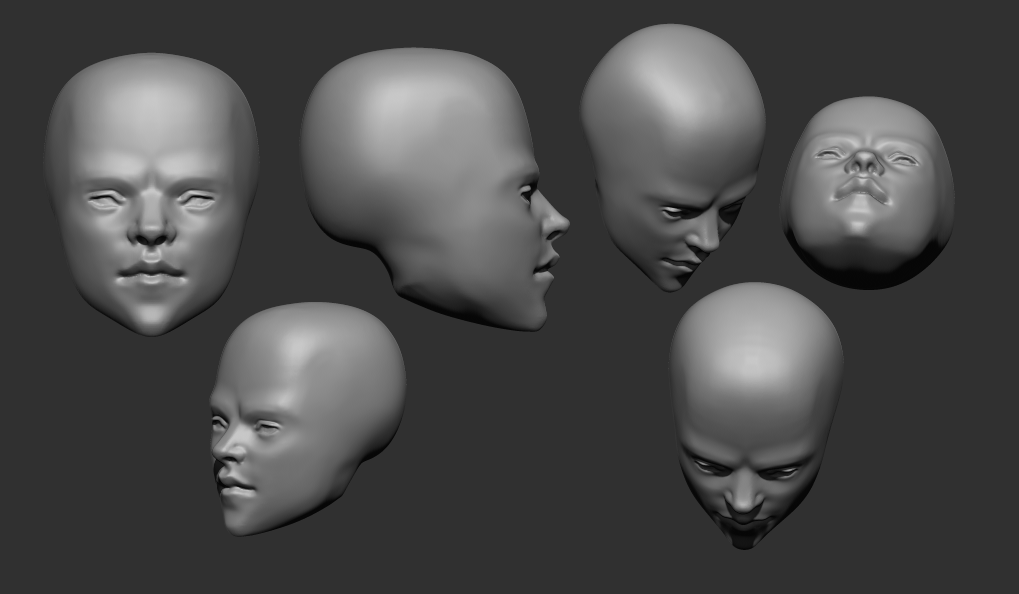
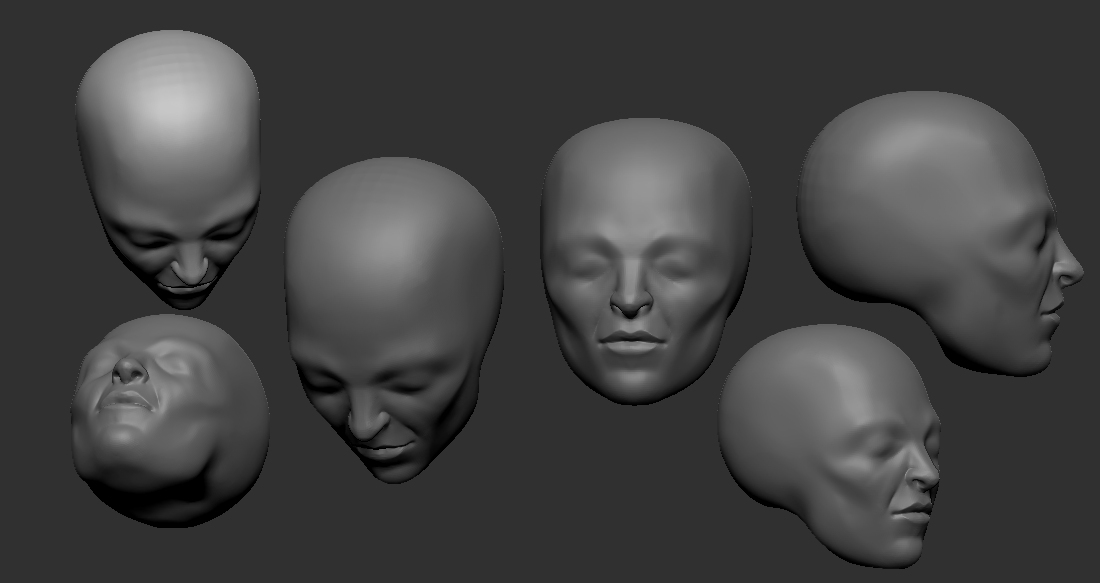
The head, hands, and feet, were ones I made separately and attached. I had trouble here. The resolution the body needs to get a reasonably level of detail is only about half, or maybe 2/3, of what the head will need. If you dynamesh the head to match the body, you can’t get an adequate level of detail. But if you dynamesh the body to match the head, if you want to tweak things, it becomes more difficult. And it results in a larger file size, making saving and loading more of a hassle. At times like this, I’m very envious of traditional sculptors. To sculpt without ever having to think about a polygon count or something technical like that would be lovely.

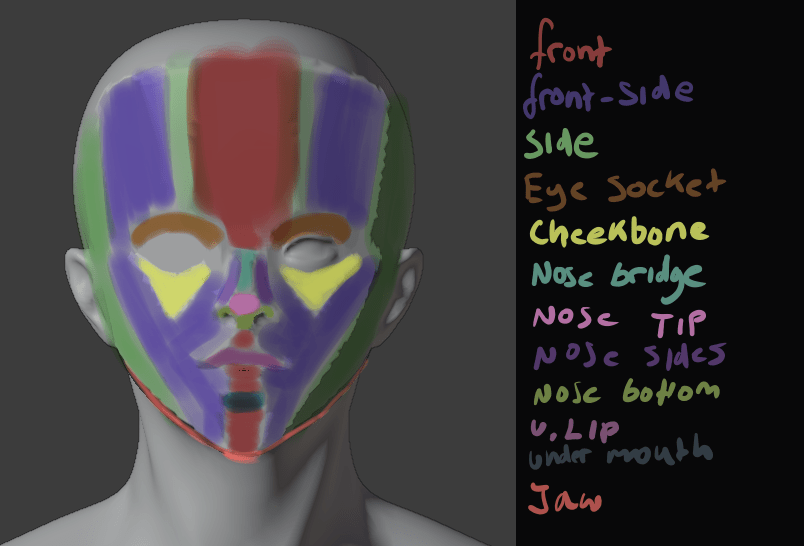
It’s also hard when you have to make a mouth cavity, and eye cavities to make them something you can rig. It’s difficult to do those without losing parts of your original face structure, mouth shape, etc, I’ve found. Still, I did that as best I could, and then moved onto clothing and armour.

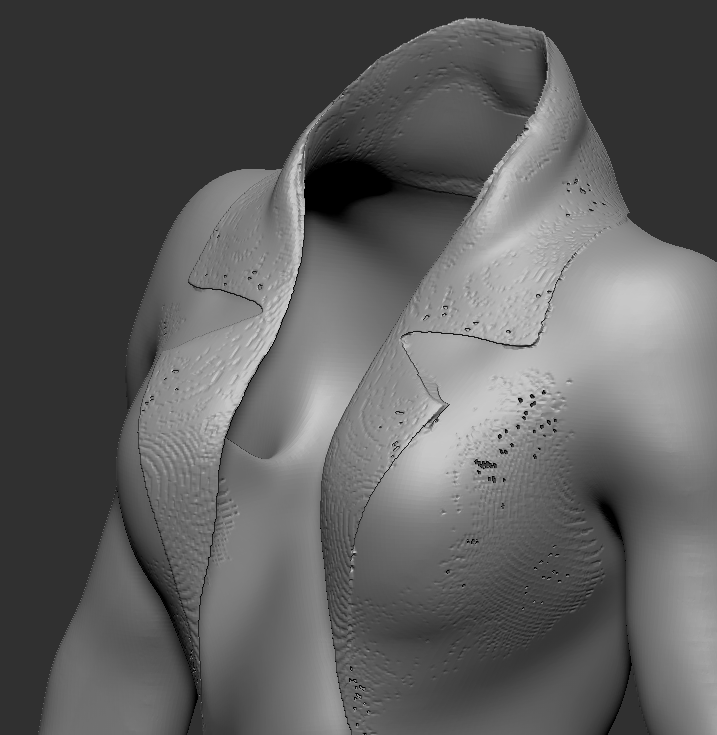
That’s an area I’m still incredibly weak at; I just don’t have much experience, and the logic of the way clothes are put together, and fold and crease, is completely different from muscles and bones. I’m also not sure, when it comes to technicality, how to put it together. A lot of things would be easier if I only had to consider them as a statue. But models for posing are completely different. I made most of the parts I needed, though they’re not good. The leg parts, I just became frustrated and did a very simplified version. I wasn’t satisfied with it, but it was still something.

Then the last problem was topology. I’d found before that automatic retopology wasn’t quite reliable enough, giving me so-so results in important areas. I thought it would be best to at least do the face manually, but because it was too hard to attach a manual face to a mid poly model, I ended up just manually retopologising the whole thing. It was good practice, but horrible; it takes much too much time, and the ZSphere retopology ZBrush allows didn’t work well on the hands and feet. I ended up having to do them separately and awkwardly attach them.

I later did some tests; it might be better next time if I just do a very low poly auto retopology on the body, make a manual head and attach it, then modify the topology manually as needed and subdivide to the resolution I need. Either that, or I’d have to suck up ZRemesher’s really high poly results.

The trouble with that is performance. In the end, after all that effort, I ended up not even being able to use my model, ugh. The polycount needed to keep most of the details from my model seemed to cause Blender to choke. It kept freezing up on me, and then just crashed outright, without even freezing. It can’t seem to handle it at all. Ever since 2.8, the performance has been bad, and it looks like the recent version is even worse.

If I can’t even do anything with the model, it might as well be a statue, and then I wouldn’t have had to bother with topology or any of that in the first place. It’s incredibly frustrating to have spent my days off on it and then have the software screw me over. If it can’t even handle the character, how will it handle it rigged, in an environment?

So, I’m feeling very frustrated. Wondering why I bothered if it can’t even handle it after all I did. I’m feeling torn. I sometimes just want to give up….But I really want to sculpt and make art. I’m not really sure what I should do. I need to think it over and work out how to make things work, or if I should just give up on it, or change things a lot.

Losing Sight

This year, I’m really wanting to make more art. I also want to make better quality art. To that end, I spent a lot of January trying to learn GLSL. I’ve started using the new renderer, Malt, to give me a lot more flexibility in the way I render. It took me several weeks of learning and experimenting, but I was finally able to more or less replicate my existing watercolour shader in Malt.

It’s quite convenient in some ways. It can do a lot, and in real time. Some of its features, like the linework, were available in Toonkit, but so much slower. I suspect, if Malt catches on and adds more basic shaders to use, it’ll kill Toonkit by virtue of the fact that it can do anything that can and more, and hundreds of times more quickly.

Unfortunately, though, I realised I’ve had a big blind spot. I tried making a Ryou model, but…It’s just shit.

The only good thing about it at all is the hair. I like the hair. I learned how to use curve-based hair better this time. But that’s all. The model itself is very flawed, the topology isn’t great, the normal editing is choppy, the clothing is simple, the colours aren’t good, the shader didn’t come out right….It’s just bad.

I realised, while trying to finish this for the sake of having it done, rather than dropped, that I’ve had serious tunnel vision for a long time, sigh. I’ve been so fixated on the quality and flexibility of the shaders that I didn’t focus at all on the fundamentals.

The topology is inadequate. It’s dense where it doesn’t necessarily need to be, it doesn’t flow as cleanly as I’d like, and it isn’t convenient for normal editing. I’d been leaving it up to the Zremesher, but I think that may actually have been a mistake. I did some practice, and…There really is nothing quite as clean as hand-placed topology.

I tried doing some manual retopology on a head I’d made. I like the result a lot better. It looks cleaner, and because it’s a subdivision surface, I can spend less time on the topology and still have it match the dynamesh properly. It seems I can also edit the topology of an existing mesh, as long as it’s under 15,000 points. I’m thinking that from now on, I might just use Zremesher for the body, and then do the head, and maybe the hands, myself. It would make it much easier to get good topology while accounting for the shapes needed for good normal editing, I think. But it does take a bit more time, unfortunately.

Then my other main problem is clothes. I’ve focused a lot trying to learn anatomy, but not enough on fabrics. How to model them properly, make them look right. I’m near clueless at that.

Then there’s rigging, which I’m incredibly weak at, and because I’m bad at that, the posing is bad, because the rigs aren’t good and the weights aren’t optimal.

I need to do so much learning in these areas….The best shader in the world won’t make a badly modeled, stiffly rigged mesh look good. I don’t know how I overlooked that….I’m really angry with myself for fixating so much and forgetting my fundamentals. I need to change…Basically everything.

So for now, I’m planning to just focus on my models. I’ll do some renders, I think, but only as 3D renders. Not worrying about NPR for now, just the quality of the models, the rigging, themselves. I need them to be better for the renders to be better. I’m so stupid…Losing sight of something so obvious.

I’ll work hard on revisiting the fundamentals for now, and make as many good models as I can.

Serph, Perfectionism, 2021

I haven’t posted in quite a while. But actually, I’ve been sculpting a lot recently.

Around the end of this last year, I think I reached a breaking point with my perfectionism. It got to be so frustrating. Back when I started taking sculpting seriously, I was always wanting to get better. To make what I could sculpt match what I could imagine. But, because of that, I got frustrated time and time again. I was constantly scrapping things, and redoing them, and then scrapping that, too. And then I would hate myself for not finishing it, but I’d hate myself for what it was and think it wasn’t worthy of being finished anyway. Thinking back…It was a very toxic cycle. I don’t know if I can say I’ve escaped that. But…I am trying.

I felt like making some Digital Devil Saga fan art a while ago. I made a model of Serph, and some sketches of others. Serph, being the leader and player character, I decided to focus on first and use for practice. I’ve actually learned a lot from this.

For starters, I used one of my base meshes again. I think I improved a bit on the legs, but they’re still not good.

I had a lot of trouble making his armour. Clothes in general, I’m not very experienced with. Let alone armour that doesn’t exist in real life. I ended up researching quite a bit on ways ZBrush artists make them; I ended up finding different, potentially better ways I could have done them after the fact, gah. I ended up having to do some elements in Blender, mainly those round elements. I don’t know what they are, so I couldn’t reference well. The jacket was also a challenge; it’s symmetrical in overall shape, but the zip goes across it diagonally rather than down the middle. Fortunately, ZBrush had just updated with a slice tool for the Zmodeler, so I was able to use that to cut the zip in. I used Zbrush’s default stuff for the zips, but I don’t like to do that, so afterwards I looked it up and learned how to make my own. Next time, I’ll use those instead.

The armour isn’t well done, honestly. The polygon density is all over the place; just compare the jacket to the sleeves, or the boots. It feels tacked together, which it kind of was. I felt clumsy trying to model it. I need to gain experience and skill with that, and make a better go of it next time I make clothes and armour.

I did try some different things this time, though. I found the Zremeshed model was too dense and slow, so I needed to keep detail, but on a lower poly mesh. I found out I could use a tool to draw lines on the model and convert them into polygroups, and use those to help guide the remesh, so I tried that.

It was actually quite effective. I’ll need to play with it more next time and see if I can learn how to make it tick most effectively. I think a careful combination of that and Zremesher guide lines should give a good result. I need it to be relatively low poly; Blender, since 2.8, doesn’t have great performance.

On another note, I tried something different with the shading, too. It seems, in the NPR community, people either use Abnormal or the data transfer modifier right now to get good shading. But, Abnormal is too slow for me to use on anything like this. And the data transfer…It is handy, but I can’t get to like it. It’s so…Uncontrolled. You just have to hope it gives you what you need. And, because it’s going off of geometry positions, you can’t really do anything that’s too far away from it, or super wonky. Limits.

So, this time, I tried painting vertex groups and using the Normal Edit modifier.

Each group was related to a vector. It’s a bit similar to what anime-style NPR artists had done, but they can get away with a bit more, because they’ve been using simpler, generally more moe, styles. But building straight into your topology has problems; if it’s simple in or out of the vertex group, it has a hard edge, so the light will suddenly snap. And if you use any gradients with it, you’ll have an area that gradually lightens as the light is rotated, but where the lit area remains all the same, looking unnatural.

Those also can get away with a bit more. Like using one vector for one side of the face, and one for the other; in a cel-shaded style, a sharp crease in the middle of the face isn’t necessarily so bad, but not good here, so I had to make several. A front, front-side, and side. I could make even more if I wanted to, but I think blending between those is enough.

By using weight paints, I could give it smooth shading at the end. While I was working on it, I used a hard-edge weight paint brush; no need to make it smooth by blurring until I knew it was going to be good. Although, next time I could build the shapes into the topology a bit, too, and just smooth out their edges. Although I’m not too fond of that idea; it seems like it could mess with the deformation in animation.

It took a while, since it’s my first time trying this method, but I was satisfied with the results.

I really liked the face shading here. Although, it’s difficult to get it right from all angles.

I also did some normal editing on his armour; this is an incomplete version, which you can tell from the face being non-smooth. On the armour, I tried for a bit of a simpler version. Just a front, back, left and right group. I think it made it more prone to being dark, though. I tried to follow the shape of the armour. I’ll have to practice this more. But, I liked how it came out, mostly.

I’m also on V10 of my shader. Right now, I’m using Toonkit for Cycles. It’s convenient in some ways. It lets you isolate the shading of a specific light, and it lets me use an outline, which I used to make a softer edge, that won’t mess up like fresnel.

The trouble is, as it’s cycles, it’s a lot slower. It also doesn’t give me any way to account for reflections, unlike Eevee. I think I could replicate it in Malt/BEER using GLSL, given a bit of time, but I tried it and the performance was shockingly bad. It seems my computer’s VRAM is way lower than it should be.

Ultimately, I was very disappointed, though. I had trouble rigging it, and just got frustrated and finished it so I could be finished.

It just looks bad, sigh. I couldn’t control the linework well, and after baking the normals to textures, they had some artifacts. The face doesn’t look good now – maybe in part because of the colours – and it’s stiff as fuck. And because it was Cycles, it was difficult to see these things before rendering. Plus, some of them probably would’ve gone away if I’d used more samples, but it would take hours to render. I need to investigate more and find a solution.

Lightning Boy Studio released their shader for Eevee. It’s quite good.

I don’t intend to buy it, though. I can already do pretty much everything it can. But, what catches my eye is how it can isolate different lights. I’d known for a while it’s possible using drivers, but I don’t like to use them because it means you have to either keep one light with one character no matter what you do, or go to the hassle or resetting it every time. But, being able to do that in real time would be very convenient. The trouble is, Eevee still has no way to give me the outlines I need. I don’t really want to drop that feature, because it’s important for getting an uneven edge and making things look less 3d without compromising the linework with actual displacement. But, it’s worth looking into. I want to isolate lights, but in a way that minimises the work I have to do. One or two clicks would be best. Although, my shader in general seems to choke Eevee, so even if I could do that I’m not sure how much good it would do.

All in all, I’m frustrated, but I still have goals. I want to make another model. And then another one. And another one after that. Each time, I can learn. I can make the next one better. I want to make the next one better. I don’t want to be bogged down hating myself and what I’ve made anymore. I’m not really one for new year’s resolutions, but I do want to make a lot of art this year.

I’ll make another model of Serph when I’m a bit better. A better one. But not now. Not scrapping this one to do it.

Progress

I’ve had a bit of time off work recently. Unfortunately, I’ve been having to move my sleeping pattern around quite severely, so I haven’t been able to use it all as much as I’d have liked to; it’s hard to concentrate when tired.

Still, I’ve been progressing, I think. I’ve almost finished my model of TKB.

I spent a while testing out different methods to see if I could capture shading information separately to the silhouette’s vectors. Object based normals seemed to work, but don’t hold up from every angle. I don’t know how to fix that yet, urgh.

Modeling clothes and such was difficult…I’m not skilled with them. A lot of the time, they’d be sculpted with the creases and such on them already, but this is one I’d want to post in various ways, and they wouldn’t look natural when the creases would be identical in every shot. So I’m keeping the basic mesh simple, and then I’ll add those as and when I need.

I’m using colour masks to separate different colours. Using R, G and B separately, I can three colours for one image. I’m not good at painting on patterns and such, though. I’m very inexperienced with that.

As it stands, I’ve applied most of the shaders to him, but…It doesn’t look good to me, or like watercolour. Obviously, the shading needs correction, as I haven’t edited his normals yet, but it’s more than that. The silhouette is crap; they always need normal editing to become decent, and even then, it’s not as reliable as I’d like. What I really need is a two dimensional outline…Something that can just consider how it is as a flat shape, not something in 3d space. I could displace it using the camera, but I’d have to change that modifier every time I changed the camera. I need…Some way to filter out those details, to simplify the normals data it’s using. Normal editing works, but I can’t have a real set of normals for a silhouette and another real set for the shading. And it’ll look very 3d if the edge is so perfect without it.

I also did a bit of sketching. I’ve been testing out the Flatten brush. I usually use the Trim Dynamic brush, but the Flatten one seems more effective. I like to sculpt in a fairly planar way, so it’s good at that. I tried sculpting Heat, and retooled his sketch-head into Serph for fun.

I also practiced mouths. I think I have a better grasp now on how I’d like to model a mouth interior. I’ll try applying it to my next character models.

Progress

I’m feeling better now than I was last time I posted. Still a bit frustrated, but better. I’ve been doing more sculpting and working on my shaders.

I’m up to version 9 of my watercolour shader now. It’s almost complete, as far as key features. I want to re-add the ambient occlusion into it, but it seems very particular; the threshold needed on the colour ramp to make it show strongly enough is about the different between 0.99 and 1.0.

I’m having problems recently, though….It keeps crashing on me. I spent a day getting frustrated and trying to find out why. It seems it’s to do with the negative space. In real watercolour, to make that you’d most likely isolate a space you want to keep white, like masking it out. I tried to replicate this with my shader by using a factor that mixes the applied colour (silhoutte, shading, etc) with the canvas colour, and removes edge soak and such, so you get your colours with that area preserved.

The trouble is, if you isolated that area, I think you’d get edge soak at the edges of it. At first, I thought i could just pipe in the negative space to the colour mask I use to control shading. That would remove the colour there and it would be put through the same ramp as the silhouette, and get edge soak. It does get edge soak, but because that ramp’s result is used for the alpha, it also means it gets transparent there, which isn’t the desired result. The next logical step, then, would be to just use the edge soak node directly on the negative space and add that to the edge soak of the silhouette, shading etc, itself. But it crashes. Even just using the edge noise, it crashes. If it’s manipulated directly, it crashes. I don’t understand it. I tried debugging it. I tried using the same node combination outside of the node group, and it worked. But inside it, where it needs to be? Crash.

It’s very frustrating. So for the moment, that’s missing from the shader. I think it’s a bug in Blender itself; it seems to be present in 2.82 and 2.90, at the least. I’ll have to try a workaround, like combining it into a colour and seeing if that works when it’s not being manipulated directly.

Because of that, it’s not quite right, but I’ll have to make do right now.

I’ve also been wanting to sketch more. Last night, I had a whim and had a go at sketching Helda from Ascender. Her face is a bit difficult…Very strong and angled, but feminine. I found it fun to sketch, though; I need to sketch more. Recently, I’ve been thinking that I’d like to do more sketches and sculpts that are just there to be sculpts and rendered as such. Not necessarily things that I’ll process to render NPR-style.

Eyes are nice to sculpt. I find them difficult when I’m doing them for an eyeball mesh. But I found after sketching these, it was easy to put one in for a test. I might sketch them first like this from now on before doing the actual mesh eyes. I got some help from Millie with the face proportions, though. She pointed out, I tend to make the noses too short, which is fair. I’m not good at noses; I end up making them too short because I’m worried I’ll make them too long and they’ll look bad. I need to fix that.

Lastly, I’ve been thinking of how I might normal edit my meshes to look better. I was thinking I could isolate the planes of the face using face sets, vertex groups, polygroups, etc.

I tried grabbing them, roughly, on a demo head, and using GoB. I can have it convert them to vertex groups or face sets, but face sets can’t be used with modifiers, so vertex groups are better. This way isn’t very precise, though; I think instead, I’ll just paint the vertex groups in Blender, where possible. I can soften their edges a bit, too, which should help it be a bit smoother, I think.

The Abnormal addon is what most NPR people seem to use these days, but it performs too slowly for me. Maybe because of the meshes I’m using being fairly high poly, but whatever the case, it’s not quick enough. I was thinking of using the normal edit modifier; I can select the vertex groups I need, set up an empty, and have them point at it. It’s non-destructive until applied, and I can rearrange them, add or remove from the group, so that’s helpful. A little bit slow, though. This method also relies on quality topology a bit more, and sometimes, shapes being built into it, so I’ll need to account for that. For my current model, TKB, though, I’ll just use vertex colours to fix his shading.

Hopefully I can post again soon; I’d like to show more sketches and things.

Introversion

Recently, I’ve been thinking about something in media that really annoys me. It’s about introversion.

A lot of the time, in media, especially western ones, it seems like being an introvert is looked down on. American media seems very problematic with that; treating us like we’re something to be avoided or looked down on. Just look at stuff like The Big Bang Theory; they’re treated as weird for not going out drinking or partying, and their interests, too. It’s always like “You just need to be fixed”. Like having the introvert girl that wears glasses get a makeover into a generic extrovert girl by the end of the film, or “realise” that what she wanted all along was to be an extrovert. Or act like the only reason someone might want to be by themselves or such is because of some trauma, or anxiety.

It really feels like extroverts are running so much of the media. Projecting in their ideas about what people’s lives should be like. Going out all the time, drinking a lot….It sounds utterly exhausting to me. I’m not some shut-in hikikomori, but I don’t want to go out all the time, or drink. They seem to act like that’s a bad thing; that only things like that, nightclubs, etc, are a valid way to have fun.

I especially started thinking of it because of a crappy anime called Uzaki-chan Wants To Hang Out! It presents the male protagonist as if he’s some antisocial guy. But really, he just seems fine by himself. Not needing to be always with someone or spend a lot of time or money. Uzaki…..Who’s creepily, creepily drawn looking like a child with enormous boobs and sexualised to hell, hassles him to take her places or do stuff together, calling him a loser and a loner and generally being a cow. If someone acted like that to me, I’d stop talking to them. But the way it makes it out, it’s just that he needs to be slowly brought of his shell, rather than that she’s dragging him into things. I’ve heard it’s popular. It’s annoying how introverts are so often depicted as needing to be fixed.

This isn’t a very orderly post, or some essay on how or why the depiction is a problem; mostly, I just felt like rambling about it because it’s bothering me. I’d like to see more good depictions of introverts in fiction. Nightclubs and pubs and such aren’t the be all and end all. If someone can have fun by themselves, or doesn’t need to go out that often, what’s wrong with that? If introverts wrote extroverts the way they write us….Actually, they’d probably just end up with the way American media writes extroverts anyway, haha. Going out drinking all the time and sleeping around easily.

I’d much rather be an introvert. At least I don’t need much to enjoy myself.

AUU Assets, Downward Spells

Unfortunately, my good feelings from the other day dissipated quickly. The last few days, I’ve been quite depressive again. A lot of bad thoughts, and having trouble sleeping. Sometimes, I think I should just give up on trying to sleep and work until I drop; it doesn’t seem to come naturally to me, anyway. And when I’m lying in bed at night unable to sleep, bad thoughts come a lot more easily. I thought about relapsing the other day, just to make them go away. I didn’t, though.

Because of that, my character progress got slowed. I felt very discouraged with them. Especially from looking at videos of people sculpting traditionally. They’re…Absurdly skilled. It made me feel bad about my skills, and the comparatively poor quality of the anatomy on my character models. I have a bit of a complex about my work being digital. It’s not true, but I sometimes feel like “It’s all the computer.” I worry because, if you took away my devices, I wouldn’t be able to produce any images. My skillset is about rendering a 3d, computer graphic of an object, into a stylised 2d image. That’s just not possible in reality. And worrying that even if I did sculpt traditionally, I’d be horrible without the convenient digital tools like move tools, undo, automatic symmetry, etc.

I do want to sculpt traditionally. But I don’t really have the space, unfortunately. Nor anything big enough to bake them in to make them harden. It’s frustrating. I’d really like to be able to sculpt traditionally, too. Maybe I would have less of a complex if I could do that and prove to myself that I can be skilled traditionally, too.

Anyway, so that really stalled me. I still don’t feel good like I did the other week. It doesn’t help my medicine ran out last week; I’ll be getting more soon, at least. In the meantime, I did some assets for Yan to help on AUU. Drawing environments is a good skill….But it’s also time consuming, and repetitive if you’re using the same place a lot. So I wanted to help her by making some reusable assets and environments for AUU. I made a VHS tape, VHS case, VHS player, and an entrance to an apartment.

Clip Studio has a convenient feature. You can bring in 3d assets, then it’ll extract linework from it and use the shading to apply manga-style screentones. When used with 2d drawings, it can blend in quite nicely. I’ve seen a few manga use this technique, too. Since AUU is a fanwork, we can’t devote full time, mangaka-like amounts of time to it, so things like this that save time are useful. I’m quite pleased with how these came out. I put a lot of effort into them. I made the doors with proper hinges, and a letterbox that can be opened and closed, and has a lock. Initially, I did them with armatures, but it seems Clip Studio Modeler doesn’t like non-character meshes to have bones, so I just set them up in a hierarchy using their pivot points in place of bones to keep the movement the same. I used Blender’s Auto Smooth option for the normals, so regardless of the topology, they’d give clean shading. I’d like to look into manual normal editing for hard surface objects, though; I feel like I could push them a bit with a bit of manual alteration.

On the VHS tape, I used booleans to model it. It made it easy to create, for the most part, but cleaning up the geometry after was a bit of a hassle compared to if it had clean, modeled geometry. I also had to remember to convert all resulting ngons into tris; Clip Studio can’t deal with them.

I’m quite pleased with how the TV looks. The linework came out very crisp, I think. Although, the vents on the TV and VHS player make thicker lines. It might be something I could alter if I was more familiar with the software. Or it might be something I could account for when modeling; knowing areas like that are prone to that, perhaps I could just model the impression of it, so that the linework will look better, and possibly do the work of making that shape for me. For example, having a few cuts at the back of the TV instead of full inset vents might produce lines along them that would express the vents. Although, this way if you zoom in it’ll still hold up; that method wouldn’t be suitable for something seen up close.

I enjoyed making these. Hard surface models, to me, aren’t as difficult as characters, and making these for AUU I know I’m doing something to help with it, which makes me feel better than just standing by while my partner does all the hardest work. I’d like to do more, if possible. Environments have also been something on my list of things I want to practice and make more of.

Tomorrow, I want to progress on Bakura again. I should be able to get my medicine, so hopefully I’ll feel more stable and not be so depressed.

Thief King’s Progress

Recently, I’ve been working on a model of Thief King Bakura. I feel like I’m finally making some progress. I sculpted him using dynamic topology, and then dynameshed him to smooth out. I used a male base mesh I made, which I’ve saved for use on other models for time saving.

I’ve run into problems with clothes, though. I couldn’t get sufficient quality from ZBrushCore. They’d melt together, and elaborate clothing seemed borderline impossible. So, I decided to try ZBrush full. I’m currently using the trial version, and its features are very convenient. In particular, Zremesher. I had to faff around with it for a while to learn how to make it tick, but I seem to have a decent grip now. Apparently, the trick is to give it less strokes, not more, which tripped me up.

It seems the less, the better. The topology isn’t quite perfect, but very good, and a huge time saver. Up until now, I’ve been using 3DCoat to retopologise the body, then having to manually do the face and awkwardly fuse it on, which takes time and isn’t as clean.

I used this for Bakura’s model. But I’ve realised some mistakes I made while doing so. After retopologising him, I discovered ZBrush seems to only allow you to bake normals from a higher subdivision level to a lower level one. You can’t, apparently, bake from one subtool to the other. I had the high detail, dynameshed TKB model, and wanted to bake them to the low detail retopo TKB model which was a different subtool, and I couldn’t. So on this occasion, I had to bake his normals in Blender. I also couldn’t seem to get the UV Master to work for me. It may be intuitive for some, but I’d rather work with real topology. Manual control would be better for UV mapping.

Anyway, this is the current state of my TKB model in Blender.

This time, I’m relying a lot more on on-model detail. My Maya model relied more on normal maps because I wanted to avoid having too many polygons, but it ended up being too much hassle. And at least this way, I have flexibility; you can always sculpt corrective shape keys for muscle movements on the fly, but a normal map is stone. You can swap it out, but it’s not truly dynamic. So I’m only going to use it for minimal things. I know the Guilty Gear Xrd method, which is popular, does it all with real geometry, but I don’t think that’s practical for everything. Not all details would have a solid start and end point. Scars can often fade out, for example.

Currently, I’m working on his shaders. I need to sort out the paper texture, fix the shading edge soak, and add masks to define differently coloured areas, like his scars. I also intend to modify the normals this time, so I don’t have to correct as much using vertex paints. Since the performance doesn’t seem fast, those kinds of changes are sluggish and difficult. I’m not really satisfied with my shader, but right now making stuff is more important. I feel like I’m making progress fighting my perfectionism. I see a lot of flaws with his model, but I haven’t let myself stop and go backwards.

I don’t want to go backwards. I want to go forwards.

I didn’t remember to record to show my process while working on this, but I do have previous versions as subtools, so I decided to make a gif to show the profession. It’s something that encourages me, too. Looking back at the progression of it from a blob to something looking reasonably like a person. I like to watch timelapses like that sometimes. I’m really interested seeing different artists’ techniques.

While working on Bakura, I was listening to some music from a drama I’ve been watching with Yan, Crash Landing On You. It’s actually very good, and has a nice soundtrack.

These tracks really remind me of citronshipping, somehow. Especially Picnic…It makes me think of nice scenes with Bakura and Malik relaxing at home, bantering, doing things together, having fun….Making Bakura start to realise that life has things worth living for in it, too. That’s something I want to show. After I finish Bakura, I’m going to make Malik to go with him, haha.

Speaking of things I like to see, I’ve been watching videos from a channel recently called DokiDoki Drawing. It’s a Japanese channel focusing on art.

I’ve been really enjoying their Pro VS Amateur videos. It’s nice to see different ways they approach things, and it’s quite informative when the professionals explain things about their choices, like things they do for balance, emphasis, style, etc. I’m not a 2d artist, but it is enjoyable seeing them talk about it. It might be better for me that way; if they were 3d artists, I’d probably feel bad about my skills watching them. They also seem to have a good variety of people on it; foreigners as well as Japanese people, amateurs and professional mangakas, etc. It makes me a bit more motivated seeing people’s progress. And they don’t take themselves too seriously; I remember them joking in one video that a cyberpunk design came out more steampunk. Not getting angry about it or taking things too seriously and losing the fun of it.

Uchida Shinnosuke in those videos has interested me; she’s appeared in a few. From what they’ve mentioned, it seems she particularly enjoys and focuses on cyberpunk. But cyberpunk isn’t very popular in Japan at the moment, it seems. But instead of ditching what she really enjoys, she continues to do it, and aims for the people who do enjoy it. That’s something that’s nice to see. Too often, people act like you should just forget what you like and go for some…Mass market appeal. I hate that kind of thing. I can understand incorporating elements that give something wider appeal. That can be a savvy move, sometimes, I think, but to ditch everything I’m interested in just for that? It would be a pointless endeavour. So it’s nice to see someone like her persisting with the genre she finds interesting regardless of whether or not it’s currently in fashion. I’m also quite fond of cyberpunk, from what I’ve seen, so that helps, haha.

Anyway, I have more to do. I think I will invest in ZBrush full. I can’t afford to buy it outright right now, so I’ll have to cough up to subscribe for a few months and save my pennies. Being able to bypass the pain in the arse stuff like retopology is a godsend. It’s not a creative step…It’s just a pain in the arse technical one. I also spent some time on my body deform cage. I’ve added IKs to the legs and arms and spine. They’re not super complicated ones, but they make it easier to pose. They were difficult to set up; I haven’t done them before now.

I’m sure animators are cringing. Or anyone with any decent experience rigging, haha. But it’s a step up. I’ll need to fix the deform cage, but as long as the bones work.

That’s all I have to show for now. This post became a bit of a ramble….But it’s good to talk like that, I think. I don’t want my blog to be just some formal thing.

Next up, Bakura’s clothes and hair. I’m going to try something a bit different this time.

Sketches And Clothes

I’ve been doing a lot of sketching recently. Until recently, when I’ve been making models, they’ve been focused at making something ready to retopologise and rig, something I could put my shaders on to render. It’s difficult, and time-consuming…Having to thing about whether it’ll hold up from multiple angles, different zooms, if the retopology is sufficient for the posing it’ll need…It’s hard.

Yan suggested I should sketch more, and when I tried, it was quite fun. It’s a lot less stressful, I’ve found, when I sketch. Not having to worry about topology or think too hard on rendering. If I want an eye, I can just carve one in. Not have to make a particular cavity for an eyeball because it’ll need to be able to rotate by itself when it’s retopologised. It only needs as much detail as a sketch needs…Not realistic, refined details. It’s….A lot more fun and relaxing. I’ve found myself getting into it a lot more.

I’ve been sculpting a lot of heads recently. I really want to get better at them. The image on the top left is how they tend to look before I dynamesh them to smooth them out. I like to carve them out more than add volume; it feels more natural to me, and it makes it easy to make the planes. Then when they’re firmly established, it’s easier to keep the shape when smoothing it out. I was quite pleased with the top left one, for a sketch.

I’m also trying to sculpt different kinds of faces….More realistic, more stylised, boney, soft. I don’t want to be only capable of sculpting one type of face. Or end up as one of those annoying CGI character artists that can only seem to sculpt scantily-clad women.

The male character there is a TKB model I’ve been working on. The face below that image is his. It’s difficult….For practice’s sake, I’ve focused on trying to learn realistic anatomy. But the Yugioh manga is very stylised, and they have very sharp faces. I couldn’t see Bakura, or any of them, with a very realistic appearance, like a wide chin or such. Takahashi’s style favoured sharp corners. So I tried to adapt that to a more realistic style, to make a semi-realistic type, keeping the sharp chin and nose, but not departing totally from reality. I’m not sure if I succeeded or not…But it’s a work in progress.

I feel fairly satisfied with his body, at least. It’s definitely not perfect, but it is better than previous ones I’d done. I took a bit of a different approach to sculpting the legs, which seemed to work out. The lower legs look better than previous efforts…Though the upper half isn’t great. I should also tweak the arms a bit…They don’t seem quite right. Too angular.

I also decided to practice making clothes. I’ve hit a wall here, unfortunately. ZBrushCore doesn’t seem to have good tools when it comes to making clothes with any complexity.

I tried making a jacket. This is an important test case because the flaps are a bit complicated. They fold over, but don’t connect, to the main jacket. Core doesn’t have any modeling tools, so I made it by masking and extracting. But when I tried to merge them, the image on the right happened. The dynamesh fuses it onto the jacket, and, I think because it’s narrow rather than thick, creates holes. It’s very frustrating….I realised working on that Maya model, it would be better to be able to just sculpt the clothes. Then I don’t have to mess about with topology until I have to retopologise it, and case relatively easily add things like zips, seams and buttons. But if it can’t handle something as simple as a flap, it’ll most likely choke on anything reasonable. And I really don’t want to have to model it and then waste hard drive space exporting it into ZBrushCore and then time having to align it properly. I tried using 3DCoat’s retopology tools to make a basic clothing mesh and then sculpt it there, but it can’t handle backfaces and lacks convenient tools to model anything that isn’t directly on the mesh, so I couldn’t really get it to work. They’d advertised their new cloth simulator and the support they’d put in the retopo room for making clothes, but it’s not really convenient for anything elaborate….Seems to be a running issue with 3DCoat.

So I’m very frustrated because of that. Character models aren’t good without clothes. I need to get better and able to make those. Especially given that some of them are very character-important, like TKB’s jacket in our version of citron. I have to find a solution.